FutureTask源码解析

FutureTask介绍

FutureTask是一种可以取消的异步的计算任务。它的计算是通过Callable实现的,可以把它理解为是可以返回结果的Runnable。

使用FutureTask的优势有:

  1. 可以获取线程执行后的返回结果;
  2. 提供了超时控制功能。

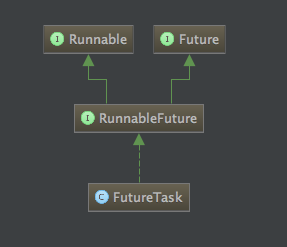
它实现了Runnable接口和Future接口:

QQ20170406-230647.png

什么是异步计算呢?也就是说,在让该任务执行时,不需要一直等待其运行结束返回结果,而是可以先去处理其他的事情,然后再获取返回结果。例如你想下载一个很大的文件,这时很耗时的操作,没必要一直等待着文件下载完,你可以先去吃个饭,然后再回来看下文件是否下载完成,如果下载完成就可以使用了,否则还需要继续等待。

FutureTask的实现

FutureTask的状态

FutureTask内部有这样几种状态:

1
2
3
4
5
6
7
private static final int NEW = 0;
private static final int COMPLETING = 1;
private static final int NORMAL = 2;
private static final int EXCEPTIONAL = 3;
private static final int CANCELLED = 4;
private static final int INTERRUPTING = 5;
private static final int INTERRUPTED = 6;

看名字应该很好理解了,当创建一个FutureTask对象是,初始的状态是NEW,在运行时状态会转换,有4中状态的转换过程:

  • NEW -> COMPLETING -> NORMAL:正常执行并返回;
  • NEW -> COMPLETING -> EXCEPTIONAL:执行过程中出现了异常;
  • NEW -> CANCELLED;执行前被取消;
  • NEW -> INTERRUPTING -> INTERRUPTED:取消时被中断。

使用FutureTask

下面看一下具体的使用过程:

1
2
3
4
5
6
7
8
9
10
11
12
13
14
15
16
17
18
19
20
21
public class FutureTaskTest {
public static void main(String[] args) throws ExecutionException, InterruptedException {
ExecutorService executor = Executors.newSingleThreadExecutor();
FutureTask<Integer> future = new FutureTask<>(new Callable<Integer>() {
@Override
public Integer call() throws Exception {
int result = 0;
for (int i = 0; i < 100; i++) {
result += i;
}
return result;
}
});
executor.execute(future);
System.out.println(future.get());
}
}

FutureTask内部结构

1
2
3
4
5
6
7
8
9
10
11
12
13
14
15
16
17
18
19
20
21
22
23
24
25
26
27
28
29
30
31
32
33
34
35
36
37
38
39
40
public class FutureTask<V> implements RunnableFuture<V> {
private volatile int state;
private static final int NEW = 0;
private static final int COMPLETING = 1;
private static final int NORMAL = 2;
private static final int EXCEPTIONAL = 3;
private static final int CANCELLED = 4;
private static final int INTERRUPTING = 5;
private static final int INTERRUPTED = 6;
/** The underlying callable; nulled out after running */
private Callable<V> callable;
/** The result to return or exception to throw from get() */
private Object outcome; // non-volatile, protected by state reads/writes
/** 执行callable的线程 **/
private volatile Thread runner;
/**
* Treiber stack of waiting threads
* 使用Treiber算法实现的无阻塞的Stack,
* 用于存放等待的线程
*/
private volatile WaitNode waiters;
static final class WaitNode {
volatile Thread thread;
volatile WaitNode next;
WaitNode() { thread = Thread.currentThread(); }
}
public V get() throws InterruptedException, ExecutionException {
...
}
public V get(long timeout, TimeUnit unit)
throws InterruptedException, ExecutionException, TimeoutException {
...
}
...

这里的waiters理解为一个stack,因为在调用get方法时任务可能还没有执行完,这时需要将调用get方法的线程放入waiters中。

最重要的两个get方法,用于获取返回结果,第二种提供了超时控制功能。

FutureTask构造方法

FutureTask有两个构造方法:

1
2
3
4
5
6
7
8
9
10
11
public FutureTask(Callable<V> callable) {
if (callable == null)
throw new NullPointerException();
this.callable = callable;
this.state = NEW; // ensure visibility of callable
}
public FutureTask(Runnable runnable, V result) {
this.callable = Executors.callable(runnable, result);
this.state = NEW; // ensure visibility of callable
}

第二种构造方法传入一个Runnable对象和一个返回值对象,因为Runnable是没有返回值的,所以要通过result参数在执行完之后返回结果。

run方法

FutureTask实现了Runnable接口,所以需要实现run方法,代码如下:

1
2
3
4
5
6
7
8
9
10
11
12
13
14
15
16
17
18
19
20
21
22
23
24
25
26
27
28
29
30
31
32
33
34
35
36
37
38
39
40
41
42
43
44
45
46
public void run() {
/*
* 首先判断状态,如果不是初始状态,说明任务已经被执行或取消;
* runner是FutureTask的一个属性,用于保存执行任务的线程,
* 如果不为空则表示已经有线程正在执行,这里用CAS来设置,失败则返回。
*/
if (state != NEW ||
!UNSAFE.compareAndSwapObject(this, runnerOffset,
null, Thread.currentThread()))
return;
try {
Callable<V> c = callable;
// 只有初始状态才会执行
if (c != null && state == NEW) {
V result;
boolean ran;
try {
// 执行任务
result = c.call();
// 如果没出现异常,则说明执行成功了
ran = true;
} catch (Throwable ex) {
result = null;
ran = false;
// 设置异常
setException(ex);
}
// 如果执行成功,则设置返回结果
if (ran)
set(result);
}
} finally {
// runner must be non-null until state is settled to
// prevent concurrent calls to run()
// 无论是否执行成功,把runner设置为null
runner = null;
// state must be re-read after nulling runner to prevent
// leaked interrupts
int s = state;
// 如果被中断,则说明调用的cancel(true),
// 这里要保证在cancel方法中把state设置为INTERRUPTED
// 否则可能在cancel方法中还没执行中断,造成中断的泄露
if (s >= INTERRUPTING)
handlePossibleCancellationInterrupt(s);
}
}

总结一下run方法的执行过程

  1. 只有state为NEW的时候才执行任务;
  2. 执行前要设置runner为当前线程,使用CAS来设置是为了防止竞争;
  3. 如果任务执行成功,任务状态从NEW转换为COMPLETING,如果执行正常,设置最终状态为NORMAL;如果执行中出现了异常,设置最终状态为EXCEPTIONAL;
  4. 唤醒并删除Treiber Stack中的所有节点;
  5. 如果调用了cancel(true)方法进行了中断,要确保在run方法执行结束前的状态是INTERRUPTED。

这里涉及到3个比较重要的方法:setException,set和handlePossibleCancellationInterrupt。

setException方法

1
2
3
4
5
6
7
protected void setException(Throwable t) {
if (UNSAFE.compareAndSwapInt(this, stateOffset, NEW, COMPLETING)) {
outcome = t;
UNSAFE.putOrderedInt(this, stateOffset, EXCEPTIONAL); // final state
finishCompletion();
}
}

如果在执行过程中(也就是调用call方法时)出现了异常,则要把状态先设置为COMPLETING,如果成功,设置outcome = t,outcome对象是Object类型的,用来保存异常或者返回结果对象,也就是说,在正常的执行过程中(没有异常,没有调用cancel方法),outcome保存着返回结果对象,会被返回,如果出现了异常或者中断,则不会返回并抛出异常,这个在介绍report方法时会讲到。

接着设置状态为EXCEPTIONAL,这也是最终的状态。

finishCompletion方法稍后再分析。

set方法

1
2
3
4
5
6
7
protected void set(V v) {
if (UNSAFE.compareAndSwapInt(this, stateOffset, NEW, COMPLETING)) {
outcome = v;
UNSAFE.putOrderedInt(this, stateOffset, NORMAL); // final state
finishCompletion();
}
}

很简单,与setException类似,只不过这里的outcome是返回结果对象,状态先设置为COMPLETING,然后再设置为MORMAL。

handlePossibleCancellationInterrupt方法

1
2
3
4
5
6
7
8
9
10
11
12
13
14
15
16
17
private void handlePossibleCancellationInterrupt(int s) {
// It is possible for our interrupter to stall before getting a
// chance to interrupt us. Let's spin-wait patiently.
if (s == INTERRUPTING)
while (state == INTERRUPTING)
Thread.yield(); // wait out pending interrupt
// assert state == INTERRUPTED;
// We want to clear any interrupt we may have received from
// cancel(true). However, it is permissible to use interrupts
// as an independent mechanism for a task to communicate with
// its caller, and there is no way to clear only the
// cancellation interrupt.
//
// Thread.interrupted();
}

handlePossibleCancellationInterrupt方法要确保cancel(true)产生的中断发生在run或runAndReset方法执行的过程中。这里会循环的调用Thread.yield()来确保状态在cancel方法中被设置为INTERRUPTED。

这里不能够清除中断标记,因为不能确定中断一定来自于cancel方法。

finishCompletion方法

1
2
3
4
5
6
7
8
9
10
11
12
13
14
15
16
17
18
19
20
21
22
23
24
25
26
27
28
29
30
31
private void finishCompletion() {
// assert state > COMPLETING;
// 执行该方法时state必须大于COMPLETING
// 逐个唤醒waiters中的线程
for (WaitNode q; (q = waiters) != null;) {
// 设置栈顶节点为null
if (UNSAFE.compareAndSwapObject(this, waitersOffset, q, null)) {
for (;;) {
Thread t = q.thread;
// 唤醒线程
if (t != null) {
q.thread = null;
LockSupport.unpark(t);
}
// 如果next为空,说明栈空了,跳出循环
WaitNode next = q.next;
if (next == null)
break;
// 方便gc回收
q.next = null; // unlink to help gc
// 重新设置栈顶node
q = next;
}
break;
}
}
// 钩子方法
done();
callable = null; // to reduce footprint
}

在调用get方法时,如果任务还没有执行结束,则会阻塞调用的线程,然后把调用的线程放入waiters中,这时,如果任务执行完毕,也就是调用了finishCompletion方法,waiters会依次出栈并逐个唤醒对应的线程。

由此可以想到,WaitNode一定是在get方法中被添加到栈中的,下面来看下get方法的实现。

get方法

1
2
3
4
5
6
7
8
9
10
11
12
13
14
15
16
17
public V get() throws InterruptedException, ExecutionException {
int s = state;
if (s <= COMPLETING)
s = awaitDone(false, 0L);
return report(s);
}
public V get(long timeout, TimeUnit unit)
throws InterruptedException, ExecutionException, TimeoutException {
if (unit == null)
throw new NullPointerException();
int s = state;
if (s <= COMPLETING &&
(s = awaitDone(true, unit.toNanos(timeout))) <= COMPLETING)
throw new TimeoutException();
return report(s);
}

这两个方法类似,首先判断状态,如果s <= COMPLETING,说明任务已经执行完毕,但set方法或setException方法还未执行结束(还未设置状态为NORMAL或EXCEPTIONAL),这时需要将当前线程添加到waiters中并阻塞。

第二种get提供了超时功能,如果在规定时间内任务还未执行完毕或者状态还是COMPLETING,则获取结果超时,抛出TimeoutException。而第一种get会一直阻塞直到state > COMPLETING

awaitDone方法

awaitDone方法的工作是根据状态来判断是否能够返回结果,如果任务还未执行完毕,要添加到waiters中并阻塞,否则返回状态。代码如下:

1
2
3
4
5
6
7
8
9
10
11
12
13
14
15
16
17
18
19
20
21
22
23
24
25
26
27
28
29
30
31
32
33
34
35
36
37
38
39
40
41
42
43
44
45
46
47
private int awaitDone(boolean timed, long nanos)
throws InterruptedException {
// 计算到期时间
final long deadline = timed ? System.nanoTime() + nanos : 0L;
WaitNode q = null;
boolean queued = false;
for (;;) {
// 如果被中断,删除节点,抛出异常
if (Thread.interrupted()) {
removeWaiter(q);
throw new InterruptedException();
}
int s = state;
// 如果任务执行完毕并且设置了最终状态或者被取消,则返回
if (s > COMPLETING) {
if (q != null)
q.thread = null;
return s;
}
// s == COMPLETING时通过Thread.yield();让步其他线程执行,
// 主要是为了让状态改变
else if (s == COMPLETING) // cannot time out yet
Thread.yield();
// 创建一个WaitNode
else if (q == null)
q = new WaitNode();
// CAS设置栈顶节点
else if (!queued)
queued = UNSAFE.compareAndSwapObject(this, waitersOffset,
q.next = waiters, q);
// 如果设置了超时,则计算是否已经到了开始设置的到期时间
else if (timed) {
nanos = deadline - System.nanoTime();
// 如果已经到了到期时间,删除节点,返回状态
if (nanos <= 0L) {
removeWaiter(q);
return state;
}
// 阻塞到到期时间
LockSupport.parkNanos(this, nanos);
}
// 如果没有设置超时,会一直阻塞,直到被中断或者被唤醒
else
LockSupport.park(this);
}
}

removeWaiter方法

1
2
3
4
5
6
7
8
9
10
11
12
13
14
15
16
17
18
19
20
21
22
23
24
25
26
27
28
29
30
31
private void removeWaiter(WaitNode node) {
if (node != null) {
// 将thread设置为null是因为下面要根据thread是否为null判断是否要把node移出
node.thread = null;
// 这里自旋保证删除成功
retry:
for (;;) { // restart on removeWaiter race
for (WaitNode pred = null, q = waiters, s; q != null; q = s) {
s = q.next;
// q.thread != null说明该q节点不需要移除
if (q.thread != null)
pred = q;
// 如果q.thread == null,且pred != null,需要删除q节点
else if (pred != null) {
// 删除q节点
pred.next = s;
// pred.thread == null时说明在并发情况下被其他线程修改了;
// 返回第一个for循环重试
if (pred.thread == null) // check for race
continue retry;
}
// 如果q.thread != null且pred == null,说明q是栈顶节点
// 设置栈顶元素为s节点,如果失败则返回重试
else if (!UNSAFE.compareAndSwapObject(this, waitersOffset,
q, s))
continue retry;
}
break;
}
}
}

cancel方法

cancel方法用于取消任务,这里可能有两种情况,一种是任务已经执行了,另一种是还未执行,代码如下:

1
2
3
4
5
6
7
8
9
10
11
12
13
14
15
16
17
18
19
20
21
22
23
24
public boolean cancel(boolean mayInterruptIfRunning) {
if (!(state == NEW &&
UNSAFE.compareAndSwapInt(this, stateOffset, NEW,
mayInterruptIfRunning ? INTERRUPTING : CANCELLED)))
return false;
try { // in case call to interrupt throws exception
// mayInterruptIfRunning参数表示是否要进行中断
if (mayInterruptIfRunning) {
try {
// runner保存着当前执行任务的线程
Thread t = runner;
// 中断线程
if (t != null)
t.interrupt();
} finally { // final state
// 设置最终状态为INTERRUPTED
UNSAFE.putOrderedInt(this, stateOffset, INTERRUPTED);
}
}
} finally {
finishCompletion();
}
return true;
}

第一个if判断可能有些不好理解,其实等价于如下代码:

1
2
3
if (!state == NEW ||
!UNSAFE.compareAndSwapInt(this, stateOffset, NEW,
mayInterruptIfRunning ? INTERRUPTING : CANCELLED))

如果状态不是NEW,或者设置状态为INTERRUPTING或CANCELLED失败,则取消失败,返回false。

简单来说有一下两种情况:

  • 如果当前任务还没有执行,那么state == NEW,那么会尝试设置状态,如果设置状态失败会返回false,表示取消失败;
  • 如果当前任务已经被执行了,那么state > NEW,也就是!state == NEW为true,直接返回false。

也就是说,如果任务一旦开始执行了(state != NEW),那么就不能被取消。

如果mayInterruptIfRunning为true,要中断当前执行任务的线程。

report方法

get方法在调用awaitDone方法后,会调用report方法进行返回:

1
2
3
4
5
6
7
8
private V report(int s) throws ExecutionException {
Object x = outcome;
if (s == NORMAL)
return (V)x;
if (s >= CANCELLED)
throw new CancellationException();
throw new ExecutionException((Throwable)x);
}

很简单,可以看到有3中执行情况:

  1. 如果s == NORMAL为true,说明是正常执行结束,那么根据上述的分析,在正常执行结束时outcome存放的是返回结果,把outcome返回;
  2. 如果s >= CANCELLED为true,说明是被取消了,抛出CancellationException;
  3. 如果s < CANCELLED,那么状态只能是是EXCEPTIONAL,表示在执行过程中出现了异常,抛出ExecutionException。

runAndReset方法

该方法和run方法类似,区别在于这个方法不会设置任务的执行结果值,所以在正常执行时,不会修改state,除非发生了异常或者中断,最后返回是否正确的执行并复位:

1
2
3
4
5
6
7
8
9
10
11
12
13
14
15
16
17
18
19
20
21
22
23
24
25
26
27
28
29
30
31
protected boolean runAndReset() {
if (state != NEW ||
!UNSAFE.compareAndSwapObject(this, runnerOffset,
null, Thread.currentThread()))
return false;
boolean ran = false;
int s = state;
try {
Callable<V> c = callable;
if (c != null && s == NEW) {
try {
// 不获取和设置返回值
c.call(); // don't set result
ran = true;
} catch (Throwable ex) {
setException(ex);
}
}
} finally {
// runner must be non-null until state is settled to
// prevent concurrent calls to run()
runner = null;
// state must be re-read after nulling runner to prevent
// leaked interrupts
s = state;
if (s >= INTERRUPTING)
handlePossibleCancellationInterrupt(s);
}
// 是否正确的执行并复位
return ran && s == NEW;
}

总结

本文分析了FutureTask的执行过程和获取返回值的过程,要注意以下几个地方:

  • FutureTask是线程安全的,在多线程下任务也只会被执行一次;
  • 注意在执行时各种状态的切换;
  • get方法调用时,如果任务没有结束,要阻塞当前线程,法阻塞的线程会保存在一个Treiber Stack中;
  • get方法超时功能如果超时未获取成功,会抛出TimeoutException;
  • 注意在取消时的线程中断,在run方法中一定要保证结束时的状态是INTERRUPTED,否则在cancel方法中可能没有执行interrupt,造成中断的泄露。